Pourquoi ma photo d’identité a-t-elle été refusée ?
Environ 1 envoi initial de photo d’identité sur 5 est refusé, mais 90 % de ces refus relèvent de 11 catégories corrigeables. Ce guide explique le déclencheur de chacun, lesquels proviennent de la couche de pré-contrôle automatisé (non annulables en première instance) par rapport au vérificateur humain, et l’action exacte qui résout chaque refus.
Dans cet article · 12 sections
- —Diagnostic rapide
- 01Trouvez votre motif
- 02Fond et éclairage
- 03Visage et yeux
- 04Position de la tête
- 05Qualité de la photo et du fichier
- 06Étape par étape
- 07Refus automatisé vs humain — pourquoi cela compte
- 08Comment choisir le moment de la reprise
- 09Quand le refus n’est pas de votre faute
- 10Ce qui constitue une photo « récente »
- 11Analyses détaillées par pays
Réponse rapide
Diagnostic rapide
Si votre photo a été refusée, cherchez d’abord la cause. Si le problème vient de la prise de vue elle-même, refaites-la : mur uni, lumière du jour de face, sans lunettes, expression neutre et prise stable avec l’appareil arrière.
Trouvez votre motif
Fond et éclairage
| Catégorie de refus | Couche déclenchante | Comment corriger |
|---|---|---|
| Fond non uni | Automatisée | Éloignez-vous de 1-2 m du mur, prenez la photo en lumière du jour frontale, choisissez une surface uniforme de couleur claire sans texture ni motif. |
| Couleur de fond incorrecte | Automatisée | Respectez la spécification exacte de l’autorité (Royaume-Uni = crème/gris, Allemagne = neutre clair, États-Unis = blanc/blanc cassé, Chine = blanc). Blanc ≠ gris clair ≠ crème pour les contrôles biométriques. |
| Ombre sur le mur | Automatisée | La seule solution fiable est la distance au mur. Une lumière diffuse de fenêtre directement de face évite l’ombre. |
Visage et yeux
| Catégorie de refus | Couche déclenchante | Comment corriger |
|---|---|---|
| Yeux non entièrement visibles | Automatisée | Retirez les lunettes, dégagez les cheveux derrière les oreilles et assurez-vous que les sourcils sont aussi visibles. Les cheveux touchant les sourcils sont un échec fréquent. |
| Reflets sur les lunettes | Automatisée | Retirez les lunettes sauf exception médicale documentée. Un reflet invisible à l’œil fait quand même échouer le contrôle de la zone oculaire. |
| Expression non neutre | Automatisée + Humaine | Fermez la bouche, détendez les sourcils, ne plissez pas les yeux. Même un « sourire poli » bouche fermée est signalé par certaines autorités (Royaume-Uni, Canada) car la ligne des lèvres se modifie. |
Position de la tête
| Catégorie de refus | Couche déclenchante | Comment corriger |
|---|---|---|
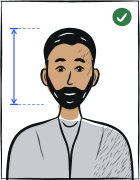
| Tête trop grande ou trop petite | Automatisée | Chaque pays a une plage spécifique (p. ex. Royaume-Uni 64-76 % menton-sommet du crâne, États-Unis 49-69 %, Allemagne 71-80 %). Envoyez un portrait plus large et laissez l’outil recadrer à la proportion exacte plutôt que de recadrer à la main. |
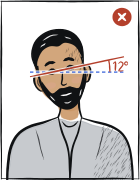
| Tête inclinée | Automatisée | Gardez la ligne des yeux horizontale. Les inclinaisons supérieures à 3° échouent au contrôle d’alignement ICAO. |
Qualité de la photo et du fichier
| Catégorie de refus | Couche déclenchante | Comment corriger |
|---|---|---|
| Image floue ou pixelisée | Automatisée | Utilisez l’appareil arrière (les appareils avant ont une distorsion grand-angle). Tenez le téléphone immobile. Évitez de recevoir la photo via WhatsApp / Telegram avant l’envoi — les deux réduisent la résolution. |
| Photo trop ancienne | Humaine | La plupart des autorités exigent une photo des 6 derniers mois. Certains systèmes vérifient l’horodatage EXIF ; d’autres le hachage de l’image par rapport à vos demandes précédentes. |
| Fichier trop volumineux ou mauvais format | Automatisée | Respectez la spécification numérique (en général JPEG, sRGB, sous 240 Ko ou 2 Mo selon le pays). Un réencodage dans un autre format résout généralement le problème sans reprendre la photo. |
Étape par étape
Identifiez le motif exact du refus
Chaque notification de refus indique le code d’échec spécifique (p. ex. Royaume-Uni HMPO « P12 — cheveux sur les yeux » ; États-Unis « Quality 04 — éclairage »). Lisez-le attentivement — renvoyer sans traiter le code précis est la cause numéro un du double refus.
Décidez : nouvelle photo ou correction rapide ?
Refaites la photo si le problème vient de la prise de vue elle-même : éclairage, reflets sur les lunettes, expression. La taille, le cadrage, la couleur du fond et le format du fichier se corrigent sur la photo que vous avez déjà, par exemple avec notre outil en ligne.
Traitez la cause, pas le symptôme
Un refus pour « ombre sur le mur » disparaît si vous vous éloignez du mur ou remplacez le fond par un fond uni — pas si vous effacez l’ombre à la main.
Vérifiez la photo par rapport à la spécification du pays avant de renvoyer
Ouvrez la page spécifique au pays sur Anfas.Pro. Confirmez la taille, la proportion de la tête, la couleur de fond, la règle d’expression et la règle sur les lunettes. Lancez ensuite un aperçu gratuit dans l’outil.
Si vous êtes convaincu que le refus est erroné, faites un recours par écrit
Les recours n’aboutissent que lorsque le motif du refus n’a clairement aucun rapport avec votre photo (p. ex. « mauvaise taille » alors que la taille est correcte). Fournissez le fichier original non retouché et une image de référence imprimée. La plupart des recours échouent car la décision automatisée est considérée comme faisant autorité en première instance.
Refus automatisé vs humain — pourquoi cela compte
Les systèmes modernes de passeport et de visa utilisent deux couches de contrôle. La première est un comparateur automatisé ICAO 9303 / biométrique qui se déclenche en quelques secondes après l’envoi. Environ 70-85 % des refus proviennent d’ici, et le vérificateur humain annule rarement la décision automatisée en première instance. La seconde couche est un vérificateur humain qui examine la composition, la tenue, l’expression et la correspondance d’identité avec les demandes précédentes. Renvoyer un fichier légèrement différent de la même séance redéclenche presque toujours le même refus automatisé.
Comment choisir le moment de la reprise
Si vous avez un rendez-vous proche, reprenez la photo le jour même plutôt que des semaines plus tard — les comparateurs biométriques sont sensibles aux changements d’apparence (cheveux, barbe, lunettes) qui s’accumulent. Les prises du même jour partagent aussi le même profil de lumière, ce qui rend la photo cohérente et plus facile à valider.
Quand le refus n’est pas de votre faute
Certaines autorités refusent des photos prises dans leurs propres studios agréés (p. ex. certaines cabines des Bürgeramt en Allemagne produisent des images qui échouent au contrôle numérique BSI). Conservez toujours le reçu original — beaucoup de studios proposent une reprise gratuite. Si le problème vient d’une cabine publique, l’autorité accepte généralement une photo récente de n’importe quelle source dès lors qu’elle respecte la spécification.
Ce qui constitue une photo « récente »
La plupart des autorités veulent une photo prise au cours des 6 derniers mois. Elles le vérifient de deux façons : les métadonnées EXIF (horodatage intégré au JPEG par l’appareil) et un hachage de similarité par rapport à votre demande précédente. Une photo qui paraît identique à votre passeport précédent est refusée même si l’EXIF indique qu’elle est récente — le système suppose que vous avez réutilisé le fichier.
Analyses détaillées par pays
Pour les codes de refus exacts et les guides par autorité, consultez les pages pays : Visa Schengen, Passeport États-Unis, Visa États-Unis, Passeport Royaume-Uni, Visa Chine, Visa Canada, Visa Australie, Passeport Allemagne, Passeport Inde, Passeport brésilien, Passeport Japon, Passeport Turquie, Passeport Corée du Sud, Visa EAU, Visa Arabie saoudite, Passeport vietnamien, Passeport philippin, Visa Indonésie, Passeport irlandais, Passeport malaisien, Passeport singapourien, Passeport nigérian, Passeport sud-africain, Visa pakistanais, Loterie Green Card (DV), Aadhaar en Inde, Carte OCI indienne, Passeport mexicain, Green Card des États-Unis, Permis EAD des États-Unis, Naturalisation aux États-Unis, Carte PAN indienne.
À lire ensuite
tous les guidesPréparer la photo maintenant
Envoyez un portrait et Anfas.Pro le recadre, le redimensionne et le vérifie selon le profil de document sélectionné.