What your source photo needs for the best result
This is not a list of rules you have to pass. It is the short list of things that decide how much of your face our model actually gets to see. The photo you upload is the only thing it knows about you — the closer, sharper and more evenly lit it is, the less it has to invent. A quick arm’s-length selfie by a window beats a carefully arranged shot taken from the other side of the room.
In this article · 4 sections
Quick answer
An arm’s-length selfie, facing a window, in colour
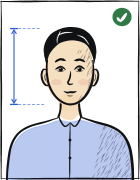
Hold the phone at arm’s length so your head fills at least a third of the picture height. Look straight into the lens. Stand facing a window in ordinary daylight rather than with your back to it. Check that the face is sharp and that the chin and cheeks are not cut off by the edge of the frame. Upload the file itself, not a copy that has been through a messenger.
Step-by-step
Get closer: your head should fill at least a third of the frame
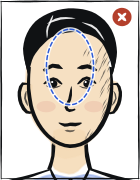
This is the single thing that changes the result most. In a real arm’s-length selfie the head takes up 35 to 55% of the picture height, and that is the range we work best in. A shot from across the room, where the head is only a fifth to a quarter of the height, leaves too few pixels of your face, and the less of it the file holds, the more the model has to invent. Below about a seventh of the frame we say so on the upload screen: at that distance a likeness is not something we can promise, and one closer shot is worth the minute it costs. Step closer rather than zooming in and cropping afterwards.
Look straight into the lens
Keep your face square to the camera. Once the head is turned more than about 16 degrees — roughly the angle at which one ear starts to disappear — half of your face is no longer in the photo, and the model has to draw the missing half from a guess. A three-quarter portrait can look great on a phone and still be the worst possible starting point here.
Turn towards the light instead of standing against it
The reference is ordinary daylight from a window, with you facing the window. Three situations cost the most: a window behind you, which puts the face in shadow; light coming strictly from one side, which lights one cheek and loses the other; and a room that is too dark or a lamp too close, which flattens the face into a shape with no depth. None of this needs equipment — turning round to face the window usually fixes it.
Check that the face is sharp
Motion blur from a moving phone is the most common thing that spoils an otherwise good shot, and it is easy to miss on a small screen. Zoom into the eyes before you upload: if the eyelashes and the edge of the iris are soft, take another one. Brace your elbow against your body or a table and give the camera a second to settle before you tap.
Colour, not black and white
A monochrome shot can be a beautiful portrait and still be a weak starting point here: the colour of your skin and eyes has nowhere to come from, so it would be invented. The same goes for heavy filters that drain the colour out. Use the original colour file.
Keep the whole face inside the frame
The chin and both cheeks have to be in the picture — if a cheek or the jawline runs off the edge, that part of your face is simply not in the file. A cut-off crown is not a problem: hair carries almost nothing of your likeness, and there is plenty of room to rebuild it. Leave a little air below the chin rather than above the head.
One face in the picture
Crop or retake anything with a second person in it. When there are several faces we work from the largest one, and that is not always the one you meant. A friend’s shoulder and half a head in the corner turn up more often than you would think.
Send the file, not a forwarded copy
Messengers shrink photos to save data: a shot that has come back to you through a chat can hold several times fewer pixels than the camera recorded, even though it looks the same on the phone. Upload from your gallery, or send the picture to yourself as a file or document rather than as a photo.
Frequently asked questions
01Does the source photo have to look like a document photo already?
No — rather the opposite. A plain, sharp, close-up selfie is the best starting point we can get. The size, the background, the crop and the head position are our part of the job; yours is a clear, current picture of your face.
02The upload screen says the result is not guaranteed. Can I still generate?
Yes — nothing is blocked. Under the warning there are two buttons, “Upload a different photo” and “Generate anyway”, and the second one works exactly as usual. The line means something in the shot makes the result less predictable, most often distance, a turned head or uneven light; the screen does not spell out which, because the only useful decision at that moment is retake or carry on. Plenty of these photos still come out well — a new one taken by a window costs a minute and is simply the safer of the two.
03Is a phone camera good enough?
Yes. Any phone from the past several years has far more resolution than this needs. Distance, light and sharpness decide the result; the camera almost never does. The front camera is fine, and the rear camera is better if someone can take the shot for you.
04Can I use an older photo?
If it is sharp, in colour, close up and facing the camera — yes. Two cautions: many authorities expect a photo taken within the last three to six months, and the result will look like you did then, not like you do now.
05What about glasses?
Clear glasses are usually fine as a starting point, although a reflection across a lens hides part of the eye. The one thing to avoid outright is sunglasses, tinted or mirrored lenses: the eyes carry most of what makes a face recognisable, and what is not in the photo cannot be in the result.
Related guides
Skip the manual steps
Upload a portrait — Anfas.Pro applies the country-specific crop, background and biometric framing automatically. Free preview before payment.